I often work with clients who want fast, drug‑free ways to ease a migraine once it starts. Over the years I've found a simple combination that can shorten an attack for many people: a guided reflexology sequence focused on the head, neck and sinuses paired with a cold gel pack applied to the forehead and base of the skull. The two techniques work in complementary ways — reflexology to shift nervous system state and relieve referred tension, and cold to constrict superficial blood vessels and blunt pain signaling. Below I share a practical, step‑by‑step routine you can try at home, when to use it, what to avoid, and how to personalise the approach for best results.
Why combine reflexology with a cold gel pack?
There are three reasons I like this combo:
Different mechanisms, same goal. Reflexology uses targeted pressure and gentle massage to encourage parasympathetic activation (the “rest and digest” nervous system) and to ease muscular tension that may refer pain to the head. A cold gel pack reduces inflammation, slows nerve conduction in pain fibres and gives fast symptomatic relief.Quick relief and longer support. Cold often provides immediate analgesia. Reflexology helps reduce the underlying drivers — neck tightness, jaw tension, sinus congestion or stress — which can shorten the overall duration of the attack.Accessible and low‑risk. Both are non‑invasive and can be done without medication, making them useful for people who prefer natural approaches or can’t take analgesics.When to use this routine
I recommend using the sequence as early in the migraine as possible — ideally at the first sign of a prodrome or when a mild headache begins. If a migraine is fully established with severe vomiting, visual disturbances, or neurological deficits, get medical advice and consider abortive medication as recommended by your clinician. Also avoid cold if you have cold hypersensitivity, conditions like Reynaud's, or open wounds on the scalp.
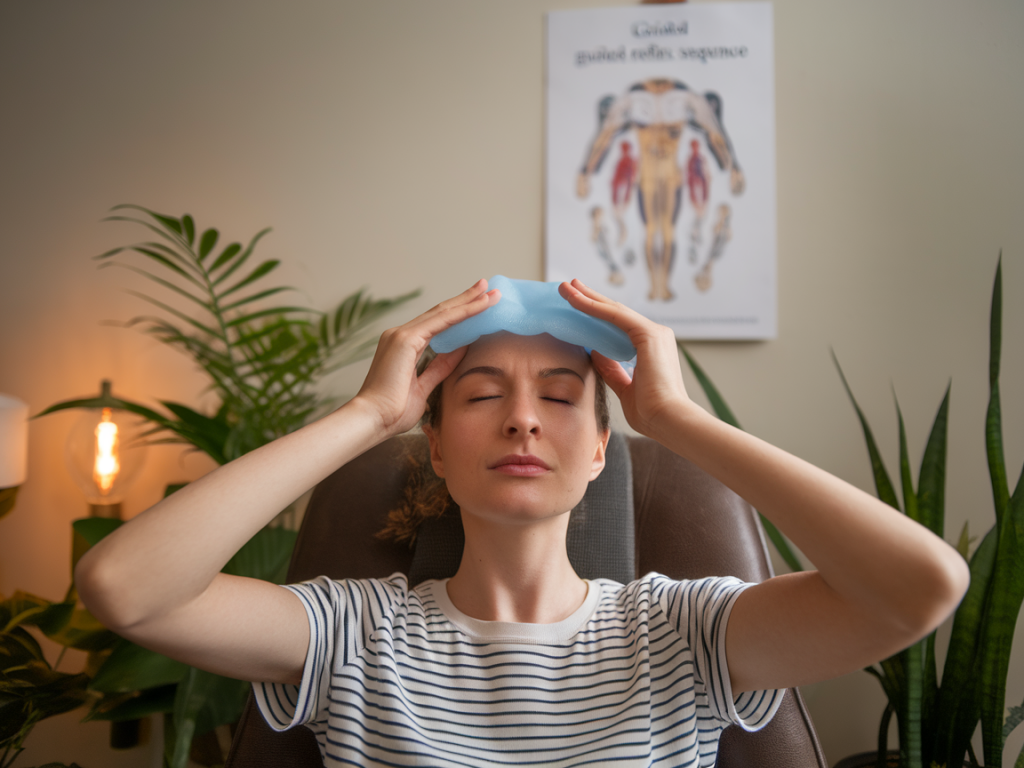
What you’ll need
A soft cold gel pack or reusable ice pack — something like the "AllFex Reusable Gel Ice Pack" works well because it molds to the head.A small towel or thin cloth to wrap the pack (to protect the skin).A comfortable chair or bed where you can recline and relax for 20–40 minutes.Optional: a small bottle of light oil (sweet almond or jojoba) to ease thumb movement during reflex work.Quick guided reflexology sequence (15–25 minutes)
This is a focused protocol I use in clinic and teach in workshops. Work gently, breathe slowly and stop if anything increases pain.
Set the scene (1–2 minutes). Sit in semi‑recline. Take 6 slow, deep breaths — inhale for 4 counts, exhale for 6. Place a cold pack wrapped in a thin cloth nearby so you can apply it when instructed.Calming hand holds (2 minutes). Place your left hand over your right hand (or ask someone to place their hands over yours). Hold light pressure across the web space between thumb and index (this area corresponds to the head/brain reflex in many reflex maps). Gently squeeze and hold for 10–15 seconds, then release. Repeat on the other side.Temple and forehead reflexes (3–5 minutes). Using your thumbs, apply gentle circular pressure along the temples and across the brow ridge. Small clockwise circles with light‑to‑medium pressure for 30–60 seconds on each temple help relieve temporal muscle tension. Across the brow, use the pads of your thumbs to glide from the center of the forehead out toward the temples.Base of skull and neck (4–6 minutes). With one hand supporting the head, use your fingers to find the bony base of the skull (occiput). Apply gentle sustained pressure or small upward strokes along the grooves where neck muscles attach — this area frequently holds tension that refers to the head. Work down along the upper trapezius toward the shoulders, then repeat on the other side.Sinus and facial points (2–3 minutes). If your migraine has a sinus component, gently press the pads of your thumbs into the sides of the nose (nasal sinuses) and under the cheekbones (maxillary sinuses). Hold for 10–15 seconds, release and repeat.Ear and mastoid area (2 minutes). Behind the ear (mastoid process) are reflex points connected to headache and balance. Use circular pressure for 20–30 seconds behind each ear.Finish with grounding hand reflex (1–2 minutes). End on the central palm — press the soft center of the palm and hold for 30–60 seconds while you breathe slowly. This gives a calming “reset.”How and when to apply the cold gel pack
Immediately after the temple and base‑of‑skull work (or while you hold the occiput points), apply the cold pack:
Wrap the gel pack in a thin towel.Place it across the forehead and the upper part of the nose. If you find relief by cooling the base of the skull instead (some people prefer this), position the pack there.Keep it on for 10–15 minutes. Check the skin every 5 minutes. No longer than 20 minutes at a time to avoid skin irritation or prolonged vasoconstriction.After removing, allow the skin to warm naturally. Repeat one more time after a 20–30 minute break if needed.How to combine the two without losing effectiveness
I usually alternate: do the reflexology work for 10–15 minutes while the cold pack is at hand, then apply the cold for 10–15 minutes as described. If you have someone to help, they can hold the pack while you continue light reflex work elsewhere (for example, the feet). The important part is keeping the body calm: slow breathing, dim lighting, and minimal movement.
Precautions and modifications
If you have high blood pressure, heart disease, diabetes with neuropathy, or circulatory disorders, check with your clinician before using cold therapy.People with neck instability, recent whiplash, or cervical spine surgery should avoid deep pressure on the neck; focus on the hands, feet or face instead.Pregnant people: reflexology is generally safe but avoid strong stimulation of certain reflex points known to be sensitive in pregnancy (consult your practitioner).If the migraine is accompanied by aura with visual disturbances, do the calming reflex steps and apply cold, but seek medical advice if unusual neurological symptoms appear.Personal tips I share with clients
Keep a “migraine kit” ready: a small gel pack, a towel, a light bottle of oil and a short printed cheat‑sheet of the sequence. Preparation reduces panic and allows you to act quickly.Practice the sequence when you’re well. The techniques become quicker and more effective if you’ve rehearsed them before a crisis.Experiment with placement. Some people find cooling the back of the neck more effective than the forehead; others prefer a small pack at the temples. Trust what eases your pain most.Combine with other gentle measures: dim lighting, low noise, hydration, and a quiet breathing practice. The whole environment supports the reflex work.If you’d like, I can record a short guided audio of this sequence so you can follow it hands‑free during an attack. In my local workshops in Southwest London I teach a slightly longer version and adaptations for different types of headache — if that’s of interest, check the sessions page on reflexologysouthwestlondon.co.uk for upcoming dates.